Runner recipes: DIY garlic and herb pizza dough
Making your own dough gives you the perfect opportunity to completely customize your dining experience!
April 6, 2020
With an abundance of free time during quarantine, I found I needed to find ways to keep myself busy. Combine this newfound extra time with my family’s love of pizza, and it becomes obvious what I thought we should do. This basic garlic and herb pizza dough served as the perfect base for us to spend some time making pizzas as a family, as well as find a healthier way to enjoy the dishes we love. This recipe is a great way to keep the whole family entertained!
Yield: 3 medium pizzas, or 6 personal pizzas

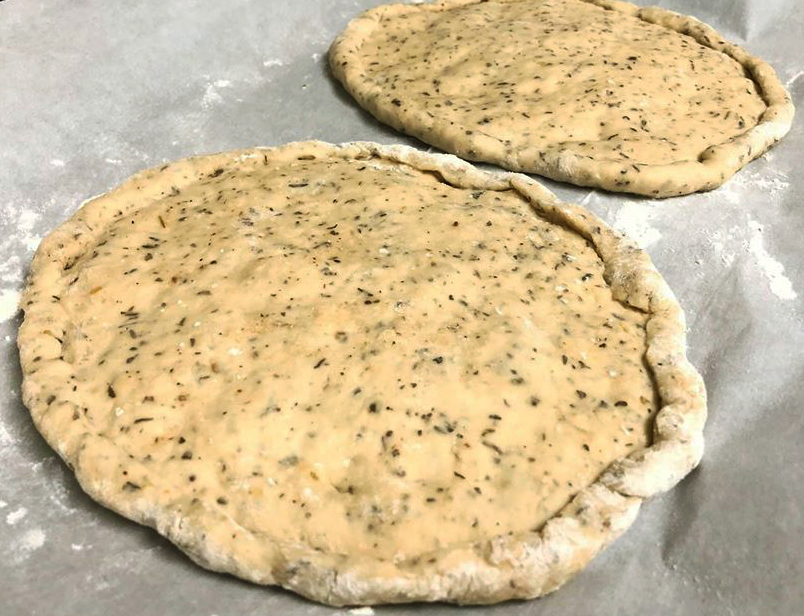
Prior to baking, the pizza dough will resemble extremely thick cookie dough.
Prep time: about 3 minutes
Rising time: 20 minutes
Cook time: 60 minutes
Total time: approximately 1 ½ hours
Ingredients:
1 tbsp basil
1 tbsp oregano
1 tbsp thyme
½ tbsp black pepper
1 ½ tbsp garlic powder
2 packets fast rising yeast
½ tbsp olive oil
5 ½ cups flour
1 tbsp butter
3 cups water
Optional: 2 tsp kosher salt
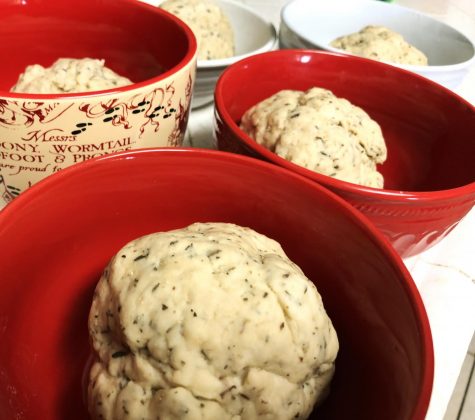
Dividing the dough before allowing it to rise will make shaping the dough a whole lot easier!
Directions:
Place the yeast, 1 tbsp garlic, basil, oregano, thyme, black pepper, and 5 cups of flour in a large mixing bowl. Using a whisk or electric mixer, ensure that all of the dry ingredients are thoroughly mixed together.
Add olive oil to the dry ingredients, and slowly begin to add the water until the proper consistency is reached. As you add each cup of water, be sure to continue mixing the dough. The dough should become too thick for an electric mixer to handle easily.
Once the dough has reached the desired consistency, which should be similar to playdoh, you will need to divide the dough for the number of pizzas that will be prepared. Make sure to divide the dough equally, and place them in a bowl to rise for 20 minutes. I chose to divide the dough to make six personal pizzas.
After the dough has been given the time needed to rise, rub flour over a large baking sheet, piece of parchment paper, or a sanitized surface. The flour prevents the dough from sticking. I do not recommend using a rolling pin for this recipe; the dough is too thick and will stick to the pin despite the flour. Instead, I recommend shaping the dough by hand.
Take one pizza’s worth of dough, and place it on flour covered surface. Begin to firmly press the dough until it is slightly flatter than desired, as the crust will continue to rise as it bakes. Be sure to press the outer edge of the crust as thin as possible if you enjoy crust, as this will later be shaped and seasoned. It’s okay if you feel that you need to get physically rough with the dough, as it can be reshaped if it becomes too thin for preference.
With the tips of your fingers, ensure the edge of the pizza has been spread as thinly as possible. Once this is done, take the thin layer and roll it inwards towards the center of the pizza. It should only be rolled forward about ¼ inch, or to create the amount of crust desired.
Once the crust has been formed, carefully relocate the pizza to a baking sheet covered in parchment paper. Repeat this process to form the dough for each pizza.
After each pizza’s dough has been shaped, place the butter and remaining garlic in a microwave-safe bowl. In short intervals, approximately 15 seconds each, microwave the butter and garlic until melted. Be sure to stir the mixture between intervals.
Using a small spoon or brush, gently apply the garlic butter to the crust for flavor. This also encourages the crust to reach a slight “crispy” texture. Optional step: for extra added flavor, the garlic butter can also be applied to the center of the dough.
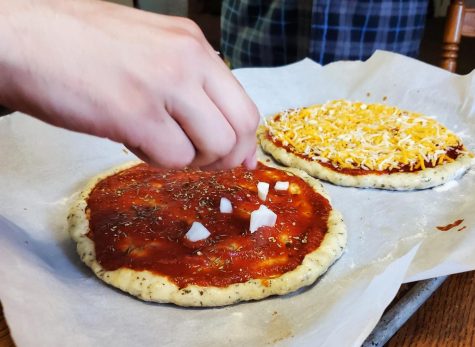
With homemade dough, the toppings make or break the pizza. Be sure that your pizza has all of the correct flavors to balance out the garlic and herb for a perfect pizza munching experience.
Preheat your oven to 375 F.
Here comes the really customizable part: toppings. This is where you can add whatever sauces and toppings you please, making the combinations available endless.
To cook the pizzas, place the baking sheet in the oven for approximately seven minutes. Rotate the pizzas, ensuring even cooking, and then place them back in the oven for about another seven minutes. Continue to monitor the pizzas frequently, as different ovens may cook the pizzas at a different rate. The crust’s color really doesn’t change much during the cooking process, so watching how the toppings are cooking is highly beneficial. The crust should be firm once cooked.
Once cooked, remove the pizzas from heat. I recommend taking the pizza, while keeping it on the parchment paper, and placing it on the counter to cool. If you leave it on the metal pan, it will take longer to cool.
Tip: If you cut your pizza and discover it has not cooked fully, place it back in the oven for a few more minutes. The cuts will not harm it during the baking process, so don’t be afraid to cook them for longer than recommended if needed!
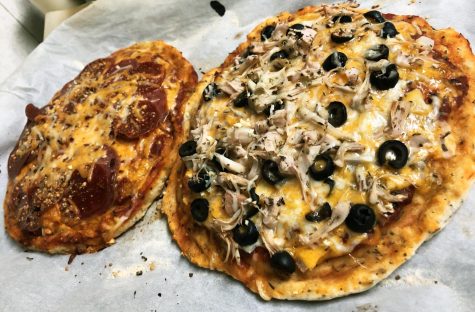
The completed pizzas are fluffy, tasty, and fun to create!
You now have completely homemade pizzas ready to be devoured! Warning: these pizzas did not last long in my household with all of the quarantine munchers, so I recommend getting your fill while they’re fresh.
Do you have a recipe that’s perfect for college students that you’d love to share? Send it in to The Runner at [email protected]!