

Runner Recipe: Malted Milk Bread
September 30, 2022
Guys. Gals. Nonbinary pals (and everyone else who does not fall within nor without the socially constructed gender binary). I would like to present the best thing before sliced bread: Bread.
Specifically, malted milk bread. With just the addition of malted milk powder, you can create a wonderfully delicious loaf that comes together in a fraction of the time as regular bread. After all, no need for such lengthy proofs to develop that scrumptious yeasty flavor when we’re already flavoring our loaf. Also, we can’t forget that roux, or tangzhong, to get that super fluffy texture. For starters (no, not the sourdough ones), gather the following ingredients and equipment.
Ingredients:
Roux/Tangzhong
- 1/3 cup All-purpose flour (1.5 oz.)
- 3/4 cup Milk (6 oz., any percentage)
Dough
- 3 1/3 cups All-purpose flour (15 oz.)
- 1/4 cup Sugar (2 oz.)
- 1/3 cup Malted milk powder (1.5 oz.)
- 2 tsps./1 packet Instant dry yeast
- 1 1/2 tsps. Kosher salt
- 1/4 cup Refined coconut oil (1.5 oz., room temp.)
- Roux
Equipment
- Pan/saucier (2-quart capacity or greater)
- Silicone/flexible spatula
- Cup and spoon measurers/scale
- Thermometer
- Stand mixer w/dough hook
- Lightly greased loaf pan (9 in. by 5 in.)
- Plastic wrap or a damp towel
- Wire rack
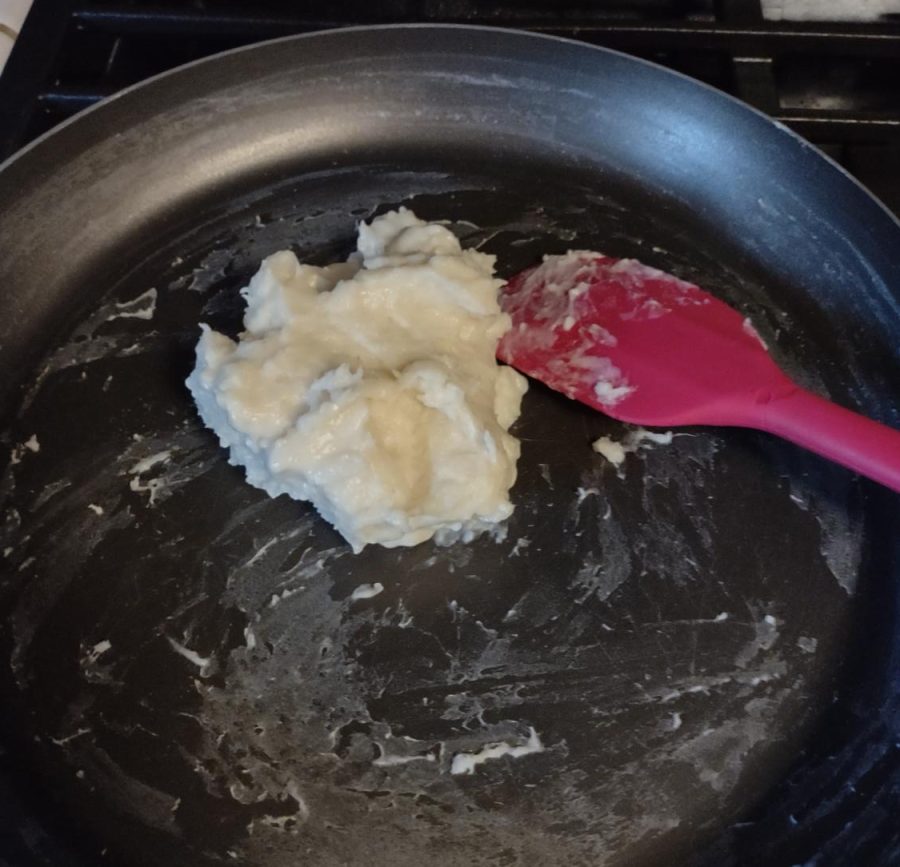
Now then, with everything you need in place, it’s time to make some bread. First off, the roux/tangzhong, which is an Asian technique that helps to create a softer, moister, and longer-lasting loaf by precooking some flour with water or milk. This results in a number of scientific jargons, but it essentially helps the dough retain moisture. So, sift the flour into the pan and mix in the milk. Set over a medium flame and cook for 2-3 minutes, stirring constantly. The roux will thicken and begin to resemble mashed potatoes when it’s ready. It will need to cool to about 120 degrees Fahrenheit. Otherwise, it’ll be too hot for the dough and yeast.
While the roux cools, you can measure/weigh the rest of the ingredients into the bowl of a stand mixer. If you do not have a stand mixer, a large bowl and electric beaters will suffice, but it may take nearly twice as long for the dough to come together. Also, I do not recommend doing this by hand. Trust me…
After the roux has cooled a bit, add it to the bowl and mix with the spatula to roughly incorporate everything. Then, with the dough hook attached, knead the dough for about 12-15 minutes in the stand mixer. If using electric beaters, this could take an additional 10 minutes or more.
When the dough starts to come together, there are various ways to test how it is ready. My preferred method is the windowpane method, where you take a small piece of dough and stretch it out, turning it in your hands as you do so. If you can get the dough thin enough for light to pass through it without tearing, it’s done. If not, knead it for 3-5 minutes and try again.
Once the dough is ready, cover the bowl with plastic wrap or a damp towel and proof for about 30-45 minutes. This can be done in a proofing drawer, if your oven has one, or in the microwave. You can recreate this effect by placing a mug of water in the microwave and microwaving it until it steams. Just push it to the back of the unit to make space for the bowl. Also, make sure not to use the microwave and let others know about it if your bowl is metal.
After the time passes, you can check your dough with the poke test. With a lightly floured finger, gently poke the dough. If it springs back, let it rest for another 15 minutes. If it retains a shallow impression of your finger and feels firm, like the palm of your hand, it’s ready to shape.
Place your dough on a lightly floured surface and shape it into a square, roughly eight inches on each side. I recommend using your hands to press and pull the dough into that shape, not a rolling pin. Once shaped, fold the dough into thirds, like a letter or brochure. Then, fold in half lengthwise to make a thin long. Pinch the seams together to seal it and place into the bread pan, seam side down. Cover and proof again for another 20-30 minutes. While the dough is in its second proof, adjust an oven rack to the lower-middle position and preheat the oven to 350 degrees.
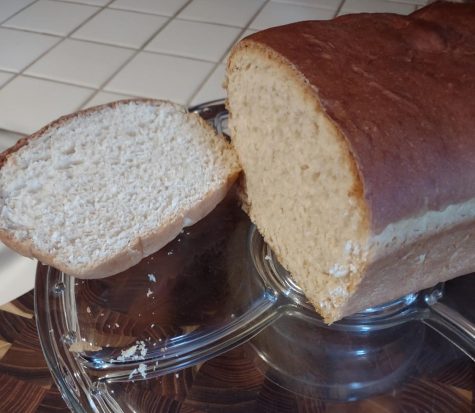
Check the dough via the poke test again and, if ready, bake for 45 minutes or until the loaf has an internal temperature of 200 degrees. Gently turn out and let cool on a wire rack for at least an hour, if not until completely cool. This loaf is incredibly light and delicate when it comes out of the oven and slicing into it too soon can and will cause it to collapse.
Otherwise, slice and enjoy in a sandwich, as toast, by itself, or in a form that pleases you most. After all, you now have the best thing since sliced bread: Itself.


Desert Dog • Jan 30, 2024 at 5:30 am
I tried this recipe and found there isn’t enough liquid. I think there should be water added in the dough section, I tried adding some but it came out very dense.